How To Patch a Garden Hose A Guide
How To Patch A Garden Hose
How to Patch a Garden Hose: A Step-by-Step Guide
Garden hoses are the unsung heroes of the lawn and garden, enabling us to keep our greenery well-maintained and looking neat. When small rips and tears occur due to regular wear and tear, you don't have to throw away your hose and purchase a new one; simply patch it! This article will provide you with a step-by-step guide on how to successfully patch your garden hose, including the supplies and tools you will need and what to do if a patch isn't holding.
Prepping the Hose For Repair
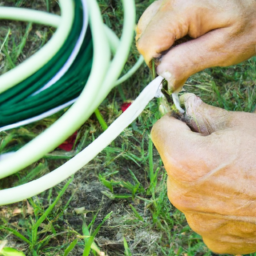
To ensure a successful repair, your garden hose must be prepped for patching. The first step you should take is to clean the damaged area with a damp cloth. If any grime or dirt remain on the damaged area, it could interfere with the adhesive of the patch and the integrity of the repair.
Make sure the hose is completely dry before moving onto the next step. Once you've thoroughly wiped the hose down, use a ruler or tape measure to measure the length and width of the damaged area. This will be important for selecting the correct size patch for your hose. You may also want to insert a hose clamp into the hose prior to patching, as that will help the patch adhere securely and last longer.
Selecting the Right Patch
The next step to patching your garden hose is to select the right patch for your needs. Make sure the patch is wide enough to cover the length and width of the damaged area and is the right material for the surface of the hose. Generally speaking, rubber patches that allow for patching on both the inside and outside of the hose are ideal for garden hoses.
Applying the Repair Patch
Once you have selected the appropriate patch, gently sand the damaged area with coarse sandpaper and then wipe it down with a damp cloth. This will help with adhesion and will prevent bubbles from forming when the patch is applied. Before you begin gluing the patch down make sure to read the manufacturer's instructions for best results.
Using Super Glue
If you're using super glue to adhere the patch to the hose, make sure to wear protective gloves. Place the patch onto the damaged area and then hold it in place while the glue sets. Once it's secured, avoid moving or manipulating the patch until the glue has completely dried.
Using Rubber Cement
If you're using rubber cement, apply a generous amount to the hose and the patch. Make sure both pieces of the patch are completely covered. Gently press down on the patch and then hold it in place for a few seconds. Leave the patch alone until the rubber cement has completely dried and it is firmly secured to the hose.
Testing Your Repair
After the patch has been applied and dried, you're going to want to perform a patch test. Attach the hose to a faucet or water source, ensuring that the hose is clamped properly, and then turn the water on. You should check the patch for any air bubbles, pieces of rubber that have peeled off, or any water leaking from the patch. If anything is amiss and the patch does not seem to be sealing as it should be, remove it and start the patching process over.
In Summary
Patching a garden hose isn't difficult to do, and you don't have to purchase a new one if yours has small rips and tears. Make sure the hose is clean and dry before beginning the patching process and measure the damaged area to ensure that you choose the correct patch. Next, select the appropriate material for the surface of the hose and apply glue or rubber cement while following manufacturer's instructions. Once the patch is applied and dried, it's important to perform a patch test to make sure that the repair has been successful. Patches may wear down over time, and if necessary, the entire patching process can be repeated.
Previous Page